Pages

Sunday, September 8, 2013

Cilantro chicken and jalapeño omelets

So we all have one, one spice or herb that we love above all the rest. Mine is cilantro. It is likely that if you follow this blog regularly you will see it pop up in a lot of unexpected places. That is mostly because I try to keep it in the house and also because I like to see what it works best with. Thus far I enjoy it the most paired with pineapple. But that is not this post that post is to come. It is one of my most enjoyed dishes who's inspiration came from a yankee candle. Who woulda thought?!?

Anywho after my roommate and her boyfriend came home with California Tortilla yesterday ( one of my favorite fast food Mexican places that you should definitely check out if you have one near you.) I was in the mood for mexican. But having just come back from a particularly long gym sesh I wasn't too keen on obliterating all of that hard work so I needed to figure out how I could satisfy that craving in a slightly healthier way. Easiest way I know of is to skip the tortillas and cheese. Blasphemy I know! But dinner still turned out pretty awesome. Again though not this post.

This post is the morning aftermath. Leftovers! I had marinated two chicken breasts yesterday in a zesty lime seasoning (well because it seemed just silly to only do one and I knew it could throw the extra one in something the next day) perfect to put in an omelet I have been craving. Of course I had just bought some fresh cilantro so that was there. I had a bit of poblano salsa I've been needing to use up along with some jalapeños. Voila let the omelet fun begin! Now even though I was able to muster some self control last night an omelet is simply not an omelet to me without some cheese so to combine the mixture I used a little bit of reduced fat cream cheese. MMMM.


Cilantro chicken and jalapeño omelets

Serves: 2
Cook time: 10-15 minutes

1 chicken breast (5-6 oz) (I had mine marinated but simply grilled or cooked and chopped will be fine!)
4 eggs (2 per omelet)
   -If you want to make this a little healthier and only use egg whites then use 3-4 egg whites per omelet
milk for egg mixture. About 3 T. per omelet
1 jalapeño, seeded and chopped
1/4. cup cilantro, chopped
2 T. reduced fat cream cheese
2 T. salsa, any kind will work, pick your favorite
1/4 cup rice (optional)
   - I also had some leftover mexican chicken flavored rice that I added in to make this even heartier. This is totally optional but recommended because it was also totally delicious. But hey I get not wanting to cook a batch of rice for a simple morning omelet.
butter or something to grease your pan


Okay so omelets are really not that hard but they can be intimidating. My tips are to prep all of your filling before you even touch your eggs. Have everything chopped and portioned out so it is ready to go. Another big tip is to make sure you are working with a very hot pan and it is well greased. You want the eggs to cook fast and you want to be able to use a spatula to push the sides towards the center so that the uncooked egg on top can move to the open space and cook easily. This is a very fast process.

But if this is intimidating or you don't want to deal with the pressure of breaking the omelet and its presentation to be ruined. Have no fear that is exactly the point of frittata! You can simply mix in your fillers with your whipped eggs and either bake in the oven until the eggs are done or stovetop covered on a low heat. Then cut and serve it like a pie.

So either way you want to start off with cutting up your chicken, jalapeño and cilantro. When you have it all diced up mix the cilantro, jalapeño, cream cheese, rice and salsa together. (You can also mix in the chicken but since mine was marinated I wanted to leave that flavor separate.)

Set all of that aside. Heat up your pan. Meanwhile whip together your eggs and milk. I use a fork to do this and add in some pepper while I am at it.
Once your eggs are whipped grease your pan with butter or you can even use a spray like pam for a lighter alternative.
Just make sure that it is well coated. Add in your egg mixture and cook as instructed before. Don't cook too long because you will burn your eggs. It is a good sign when your eggs bubble up like this. it means they are close to done.
Add in your mixture to one half of the omelet and flip the other side of the eggs over to cover the mixture.
Cook for about one more minute to heat the inside and then slide your omelet onto a plate. Feel free to top with additional salsa or cilantro!


Friday, September 6, 2013

Easy cheesy sundried tomato stuffed chicken

Like I said when I started this blog, I draw inspiration in my cooking from a variety of places. Today's recipe is from one of my favorite food blogs Iowagirleats.com . She recently posted a sundried tomato and basil stuffed chicken that looked out of this world. So when standing in front of my fridge trying to decide what to whip up for lunch before a long shift at work knowing I wasn't going to eat again for several hours. I was carefully contemplating what I could do with what little I had on hand,  and her recipe came to mind. Sure I didn't have flavored feta, but I did have feta! Also no I didn't have laughing cow cheese but I did have cream cheese and those are similar in consistency and lastly no I did not have sundried tomatoes. (Which I was kicking myself over because I always mean to pick them up at the store and I always decide I don't have a recipe on hand I need to use them in immediately and always walk away. But like I often think when I get home that needs to become a staple in my fridge.) But I did recently purchase one of my favorite dressings which is a sundried tomato basil and garlic dressing (remember from the quick kale salad) that I decided would work just as well. Anyways this is my spin on her awesome dish, which yes I will try her way one of these days and see if it beats out mine. Hehe. Because let's be honest mine turned out pretty darn fantastic especially for a throw it together meal!

Easy Cheesy Sundried Tomato Stuffed Chicken 

Serves: 1
Cook Time: 25 minutes ( this can be shortened if you cook at a higher temp.)

1 chicken breast (thick enough to cut a pocket into)
1 small piece of kale (torn into bite sized pieces)
handful of chopped almonds (about 11)
2 T. feta cheese
1 T. reduced fat cream cheese
1 T. and 1 tsp. sundried tomato basil and garlic salad dressing
Oil for the pan about 1/2 a T.


Mix together the softened feta and cream cheese with the chopped almonds, kale and 1 T. of dressing. 
Slice your piece of chicken creating a pocket but not all the way through.


Stuff the chicken with your mixture. 


Season with salt and pepper. Then cook over a low to medium heat with a little bit of oil in the pan until cooked all the way through. I didn't have toothpicks to hold this together ( another thing I need to add to my kitchen staples list) But I just made sure I packed the mixture in really tight into the chicken and it worked out just fine. I also cooked the chicken covered so I wouldn't have to do a lot of maneuvering because I knew that would cause the filling to fall out. Once it is cooked all the way through top with the last tsp. of dressing let it sit for a minute and enjoy! 


Seriously there are not many dishes that I immediately want to make again right away but this is going back on the list so I can share it with my roommate. It was so simple and amazing. Not time consuming at all and relatively healthy. Some sort of magic happened in that pan today, the chicken was perfectly tender ( mostly because I know I didn't rush it to cook) the cheese was the perfect amount of creaminess, and the crunch of the almonds was enough to make my mouth water. But the real magic came with the flavor of the sundried tomato dressing yum yum YUMMMM! 


Thursday, September 5, 2013

Sometimes it's hard for grown ups to eat their veggies too. / Bacon Pesto Pasta

Alright I will be honest and admit that sometimes more than anything else I want to neglect my veggies and eat something covered in cheese, or chocolate or deep fried. Who doesn't? But thankfully sanity is usually on my side. Or at the very least I can't convince myself to go to the store to indulge that little devil on my shoulder and usually I keep the house pretty well stocked with healthier eating options.

That being said I can usually convince myself that eating vegetables is the right way to go. Heck that usually isn't a problem because there is hardly a vegetable in this world that I don't like. But some days it is just plain difficult. (Especially when you have Oreo balls taunting you in the fridge.)

But when push does come to shove I have a few tricks I use on myself. Today let me tell you about one of them. Let us never underestimate the power of condiments. How do we get kids to eat veggies? We let them use ranch. Makes em taste better right? Well that is precisely the mentality I used today. Except for instead of ranch I used pesto.

I in all of my craziness signed up for a 5k run in a little over a week and coming home starving from training for that I needed to carb up a little. Especially since I slept in and skipped breakfast (I have got to stop doing that.) Anyways so pasta it was. Like I said I usually try to keep the house stocked with healthy options and this is the pasta I had on hand.


Voila let the trickery begin. Now I had never had vegetable pasta before until this Summer when I went to visit my aunt and uncle and they introduced us to it. I had already transitioned to the whole grain pasta craze a while ago and I still eat that, but right now I am mixing in the vegetable pastas into my diet. If you haven't tried it. Do. I like when foods have more than just the ability to fill you up but they also provide another health benefit. Food twofers! Awesome. 

Anyways I will not fool you into believing this recipe is at all complicated. In fact the title is fancier than the process. I had all of this stuff in my house so feel free to use what you have on hand. I would say the base of your dish should be pasta, pesto, and bacon. Or if you are a vegetarian no bacon. 

Bacon Pesto Pasta

Servings: 1 ( I just made this for myself but it could easily be made for more)
Cook time: 10-15 minutes

1 c. uncooked pasta
3 strips of bacon
2 T. pesto ( I love the buitoni version with basil, preferably the reduced fat one. You can even make your own version. I will add a recipe for that later on.)
1/3 c. brussel sprouts 
1/3 c. corn
1/3 c. green beans
2 leaves of kale
2 cloves of garlic

 Cook the pasta according to package directions. While this is cooking cook the bacon in a separate pan until crispy. The brussel sprouts, corn and green beans were all frozen so I just cooked them together in a bowl in the microwave for about 2 minutes. When the bacon was done cooking I placed it on a paper towel lined plate to drain off some of the grease. In the bacon drippings add your chopped garlic and kale and sauté for about 4-5 minutes.

Chop up the bacon and combine all of the ingredients together in one bowl and add in the 2 tablespoons of pesto. Mix up and enjoy. 


Wednesday, September 4, 2013

Is it Fall yet? Stuffed Squash and Sparkly Oreo balls

I want Fall weather so bad it isn't even funny. So I have decided I am going to cook my way into Fall, you know similar to rain dancing. If I cook for it, it shall come right? Let's sure as heck hope so because I am a little burnt out on Summer favorites. Not that I don't love cooking on the grill or an overabundance of fresh salads all the time, but let's face it I have my trusty George Foreman and I eat salads year round. I think my last straw into it needing to be Fall already was when I went to throw together a lobster salad for some delicious lobster rolls and it was an epic failure. Yes even I have times where I make something so bad even I won't choke it down. All I can say in those situations is thank the lord we had leftovers in the house or good ole pb&j to fall back on.

But anyways I mostly can't wait for the weather changes. This is the first Fall in my life that I haven't gone back to school. So while yes it is fantastic to be done and graduated and all educated and what not, I miss those traditions so now all I have to look forward to are the fun Fall foods, activities, and weather changes and darn it I need it now! I just want to start making pumpkin flavored everything and that to be acceptable again. Is that too much to ask?

Anyways enough of that tangent here is how I tried to delve into the season.

Stuffed Squash  

Serves: 2
Cook Time: 1 hour

1 butternut squash ( or you can even use acorn squash if you prefer it)
1/2 stalk celery
1/2 apple
1/3 chub of sausage (about 5 oz) I used maple flavored Jimmy Dean
1 c. whole wheat chicken flavored stovetop stuffing
1/4 c. dried cranberries (reduced sugar or unsweetened)
1 T. per half of squash of brown sugar (optional)
drizzle of honey (optional)


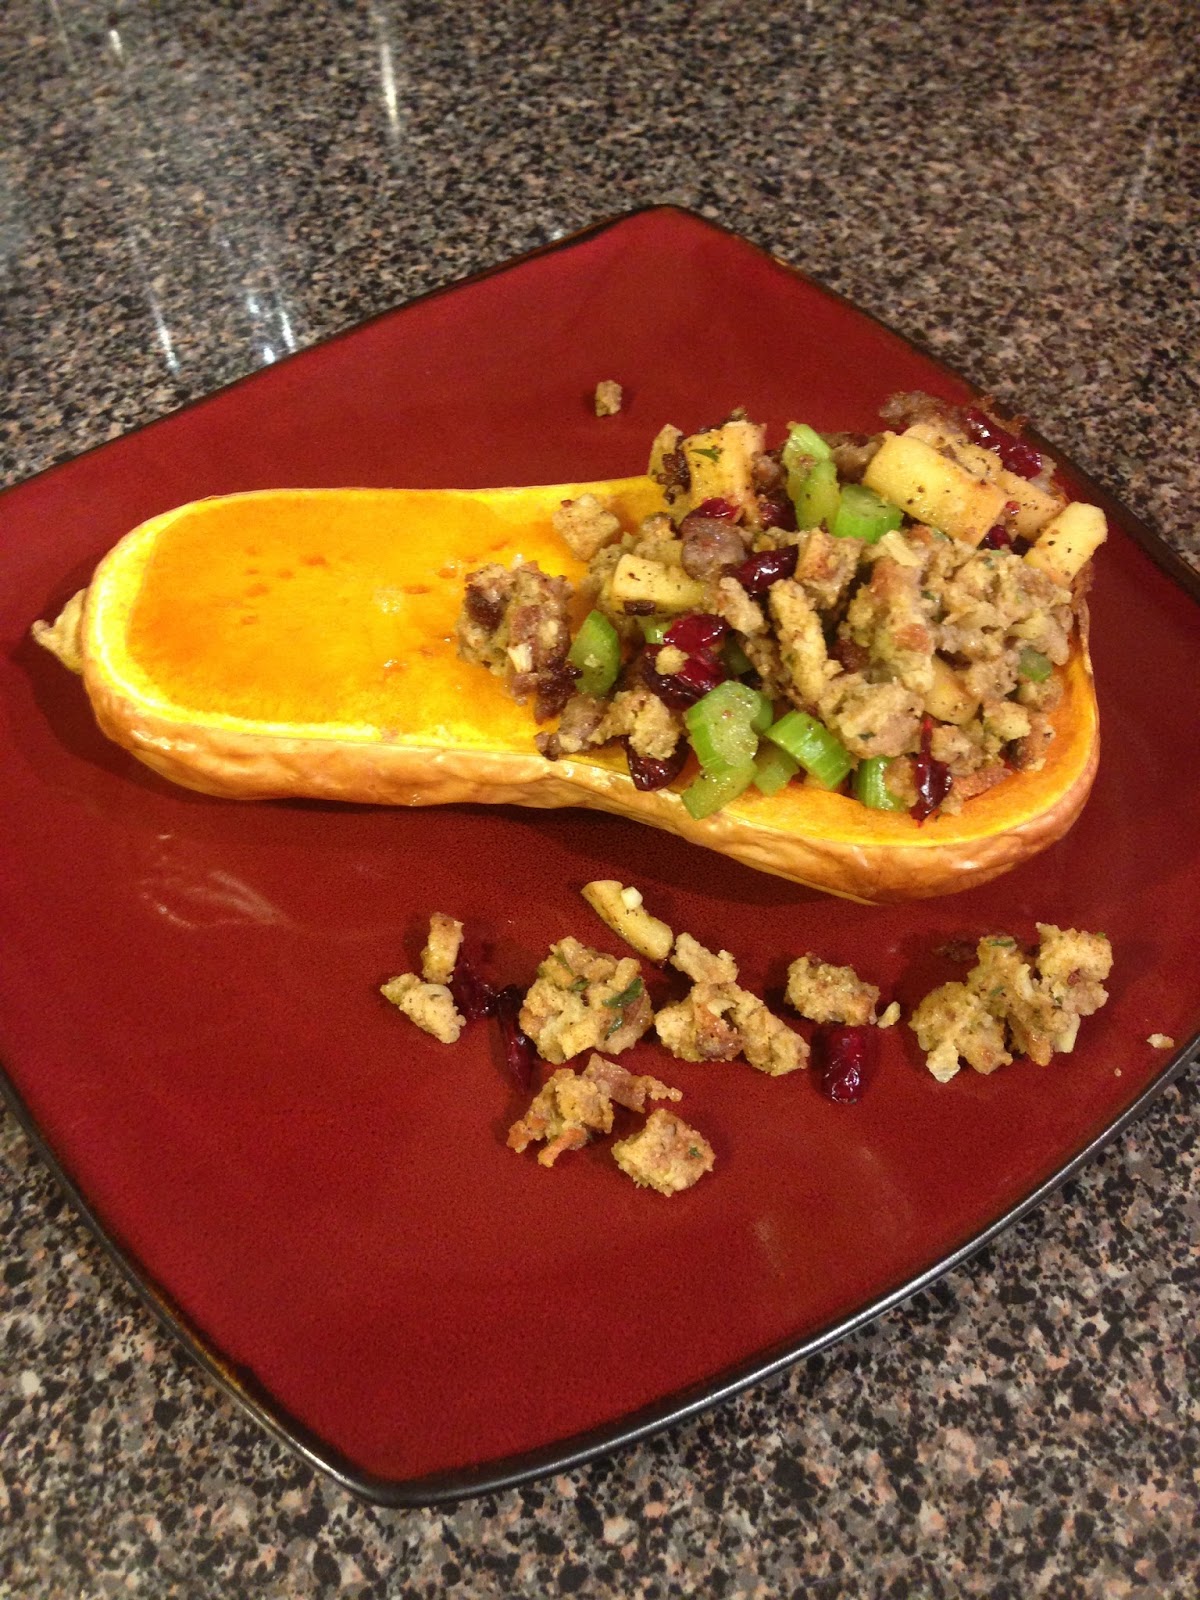
Set your oven to 450 degrees. Cut your squash in half and remove the guts and the seeds. Place in a pan and bake for 45 minutes. Then add in brown sugar to the bowls of the squash and drizzle with honey (if desired) and bake for an additional 15 minutes. If not just roast for an hour. (This worked for the size squash I had but you want to be able to stab your fork in and the squash to be fork tender, adjust cooking time for your size squash. Roughly an hour should do ya though. 


I added brown sugar and honey to the bowl and the top of the squash but it just sort of pooled around and wasn't really needed on top. Butternut squash already has such good flavor you can save the calories and skip the brown sugar and honey all together and be fine, heck you might not even notice. I was just going for a little extra comfort with this dish.


While the squash is roasting cook your sausage in a small pan. Oh and if you don't know what a chub is I took a picture. (But of course not until after I used it so its not as pretty but you get the idea.) 

I like my sausage a little crispier to add texture to the dish. 

Next you want to cook your stove top according to the package directions. This is the flavor I like and used but feel free to substitute your own preference or even a different type of stuffing. 

After you have done that then cut up your apple and celery. I then sautéed them in the pan I just cooked the sausage in with a little salt and pepper for about 2-3 minutes to cook them down a little but also keep most of their crunch.
Then you want to mix together the sausage, stuffing, apples, celery and dried cranberries. 

Then just add your mixture to the roasted squash and eat! As you can probably tell this dish is super filling. So if you are a very light eater make sure that you keep that in mind when picking the size of squash you are going to stuff. Half a squash stuffed me to the brim but if you have a heavy eater on your hands make extra stuffing mixture and serve it stuffed and along the side or even have a side salad with your meal.


Now that I think about it though I could have been stuffed because of this little appetizer I set up while my roommate, her boyfriend and I were cooking!

I found plumcots and these little cactus pears in the produce section of the store that I was more than curious about trying. So when I brought them home I decided to set them up with some cheese and almonds so we could all sample them.  My roommate and I were huge fans of the plumcots ( a plum apricot hybrid.) That is what is pictured in the center. On top are the cactus pears, they sort of tasted like a mix between a watermelon and pomegranate. Not my favorite but her boyfriend enjoyed them and they were pretty! 

Okay now onto some real fun cooking and by fun I mean partly pain in the butt because I skipped certain crucial steps that I will make sure to include in the directions here so you don't do the same. But let me tell you my little spiel about baking first. I love the end result and I am actually pretty good at it. I have a feel go to recipes in my arsenal that never fail me and even sometimes I will get the I have to bake everything in the house bug. But by no means would I consider baking to be my forte. I am all about easy and convenient when it comes to baking. Plus I really hate the aspect of how with baking you spend a lot of tedious time making things look perfect. Sometimes I can do this, but I really have to be in the mood, or it has to be a special occasion, and likely I can't have focused my attention on anything else. That is why this simple 4 ingredient recipe is near and dear to my heart. It is easy, it is quick and perfection is not a requirement.

Sparkly Oreo Balls
1 row of Oreo double stuffed cookies
1/2 a block of cream cheese (room temp.)
1 c. of chocolate chips of your choice ( white chocolate tastes best in my opinion)
sprinkles


This photo is actually from a batch I made last Valentines day. I hit a couple of snags when making the recipe this time, they still turned out delicious but for the sake of what I like them to look like this is the model. (See baking = a pain in the rear!) 

Okay first you are going to want to crush your Oreos, the finer the better. I am blessed enough to have a food processor that does this little task in about oh I don't know a minute. A blender will work just as well but if you don't have either of those items, no worries, simply put them in a ziploc bag ( I recommend using two just in case it pops open) and crushing them either with a rolling pin or a heavy pan. 

Next you will want to mix the cream cheese and your Oreos together until they are combined, like so.


Okay so that is not the best picture ever taken, but again you get the point. You want the two to be combined with no loose crumbs. I did this with a rubber spatula and took my time with it but you can get your hands in there and probably do it a lot faster.
Then you want to form them into balls. Now we had a little debate at my house, when I made the pink ones pictured above they were huge like ice cream scoop big. You can only just eat one of those. Or even half of one. This time I opted to make them smaller just little bite size niblets. We never really reached a conclusion as to what was better. Having them big like that where you will for sure only eat one but know that eating one is awful for you or the cute little baby ones I made last night where self control might not actually be on your side. So I will let that decision be left up to you. 

After you have formed them into whatever size ball your heart desires and I must stress how crucial this step is because I forgot it last night and it was a mess! But place them on a lined cookie sheet or whatever is available to you and freeze them until firm! About 10 minutes. If you skip this step then when you dip them in chocolate the chocolate will be too heavy and tear your soft little Oreo babies apart. Trust me, not fun.

After they are firm melt your chocolate chips. Save yourself the trouble and do this in the microwave. I first attempted to do it stovetop and without a double boiler, it is hard to not burn your chocolate on the stove. Which resulted in snag number two I burnt all the white chocolate in the house, and had to use dark and while I much prefer dark over white, this recipe is an exception. White just balances the flavors better. So take your cup of chocolate chips and melt them for about 45 seconds in the microwave. They will not be completely melted and you will have to stir them down so they are creamy enough to coat your Oreo balls with but too much time will burn the chocolate. So just mix. If they are being stubborn you can pop them back in the microwave for about 10 more seconds tops. 

Next just coat the Oreo balls in chocolate and sprinkles of your choosing and place them back on the cookie sheet and in the fridge to harden. Another 10-15 minutes or however long you would like until you serve them. I usually do this and leave them overnight. 

The sprinkles are optional but they make them pretty and add a nice little crunch,  and not even being a huge fan of sprinkles myself that is saying something for their existence in this recipe. But you are more than welcome to skip that part if you so desire. 


This is what they looked like last night with the dark chocolate and how they looked in the center after you bit into them. YUMMMM! 


Sunday, September 1, 2013

Heart Healthy / Oaty oaty oatmeal

So let's talk about running. One of my most loathed forms of exercise since as long as I can remember. Let's face it, when starting from scratch it is just plain boring. It takes no time at all for your breathing to become heavy to the point that your head screams STOP IMMEDIATELY! I will admit that up until this past year I have hated it with every fiber of my being. Sure up until then I could enjoy a good endorphin high but only when it came from some other form of activity. But let me tell ya something, when you are broke and live too far away from your school gym and you have a pretty decent set of trails hidden behind your house and you just need to do something it isn't half bad. It also is pretty cool when the trail that originally took every ounce of your will power to get through suddenly wasn't so bad and then even cooler when you did that trail to and from your house in record time questioning if you should do it again. ( But let's not get carried away with ourselves.) Anyways for me that is how I tricked myself into actually enjoying running. I have since moved from my little forest oasis and was faced again with the oh crap what do I do now mindset. Luckily I am now living in a community with a 24 hour gym. Let's talk about no excuses. I am too tired right now, I don't have time, it's too late; all of these are no longer acceptable. I can now go any time of day any day of the week and it is no more than a five minute walk from my house. Perfect. Now on to the next battle. Da Da Dooooon the treadmill. I have heard some pretty awful stuff about the treadmill but as someone who has fought with running and wanting to do it for the sake of fighting off the string of heart disease that resides in my family it is PERFECT! Since running is 85% mental 15% ability if you can set a goal and stick to it you are GOLDEN! Whether it is running one mile or two or three or whatever. Or running 20 or 30 or 40 minutes straight. The treadmill doesn't allow you to stop like being outdoors does. Especially when in a crowded gym, with people around the stop and go is not a good look to the hard bodies doing weights behind you. Anyways that is a little tid bit of how I am training myself to be a runner. Every soaking wet endeavor behind me the better I feel about myself and my heart's ability to beat a little stronger.

Why do I give you this long story about running on a food blog? Well because it ties in well with my ticker friendly breakfast that I whipped up the other morning before a good ole sweaty sesh at the gym.

We all have em in our houses but how often do these babies go forgotten in your cabinet?


Feel free to call me old fashioned, but I care about what I put into my body ( well most days, not today today included indulging in the newest Cheesecake Factory Toasted Marshmellow S'mores Galore Cheesecake, but we aren't talking about today we are talking about yesterday when sanity was with me. )

Anyways no longer let busy mornings stand between you and a delicious breakfast or perhaps a guilt free dessert. I made this in under five minutes with inspiration from one of my favorite food blogs Iowagirleats.com 

Peanut Butter Banana Oatmeal
 1/3 c. oats
1/3 c. lowfat milk 
1/2 banana ( okay don't waste half a banana eat it while you are cooking, or that is what I did anyhow)
1 tsp. vanilla extract
dash pumpkin pie spice
1 T. chunk low sodium natural peanut butter.

Okay combine the oats and the milk in a small sauce pan and cook uncovered for about 2 minutes. Stirring constantly. Add in chunks of banana, vanilla, and pumpkin pie spice.
Let it cook for about 2 more minutes, still stirring ( the milk likes to let the oats stick to the pan.) Remove from pan and scoop peanut butter on top. Then eat!


I like my oats a little chunky, feel free to add more milk or cook them longer for a softer creamier texture, you could even stir in the peanut butter while you cook but I prefer mine to be on top so I can choose which bites have that decadent peanut butter taste!

So even if you aren't as enthusiastic about running as I hype myself up to being these days perhaps you will do your heart a little favor and indulge in this once in a while. Seriously it is so good you won't even feel like you are eating a 'healthy' breakfast! As always ENJOY! :) 

Saturday, August 31, 2013

Quick Kale Salad

So we all have days where we are just go go go running errands all over the place. I know the last thing that sounds desirable on those days is cooking when you pass several drive thrus that offer such convenience and momentary satisfaction. Well even though a kale salad doesn't sound like it would beat out your favorite fast food chain meal for tastieness I promise you will feel loads better about eating the meal after and likely it will be cheaper too!

This is just one version of many I have for my favorite kind of lettuce. If you aren't familiar with kale it is a dark green lettuce and in its rawest form it tastes similar to broccoli. Hey that may not be for you so feel free to substitute your own lettuce fav, but personally I love it and it really is sooooo good for you. It is loaded with nutrients and fiber which I have noticed allows me to stay fuller longer after eating it in comparison to other types of lettuce. Anyways enough with my ode to kale, if you have never tried it please try it out!

But a disclaimer if you are like my family members then likely you will look at this post and think I am trying to get you to eat your own arm or something so maybe you should try it cooked in something first. (Don't you worry those recipes will appear here soon!)

Regardless I hope you give it a chance. If not, you at least have a backbone to what can appear to be a fancy restaurant salad made from your own home.

Like I said this is one of many many versions I have of this salad. I typically use whatever I have in the house, it is sort of an everything but the kitchen sink salad. My staples though are kale, frozen corn (or fresh if I have it), and almonds. I have a little bit of a health trifecta going on there between the antioxidant ridden leafy green kale, the starchy yet sweet corn and the protein packed almonds, it really is a filling salad!

Quick Kale Salad
2 leaves of kale
1/4 c. almonds
1/4 c. frozen corn cooked ( I just pop it in the microwave for 45 seconds to a minute to cook it and set it in the fridge to chill while I assemble the rest of the salad)
1/4 c. dried cranberries ( I hate dried fruits that are overly sweetened so I try to buy unsweetened or reduced sugar versions)
4 strawberries chopped
2 clementines peeled and separated
2 T. dressing of your choice
 Yes I am a little hoity toity about dressings because I knowI can make excellent fresh ones at home so when I do buy them I buy them for quality. This little gem has great flavor and can be picked up at Giant or even Target. 


Simply rip the lettuce up into bite sized pieces and combine all the ingredients in a bowl. Yes I measure everything out including the dressing. The fastest way to making a salad unhealthy is to overload it with dressing. Besides when you are packing in so many great flavors already you don't want to overwhelm them with too much dressing anyways. Sometimes if I use a lot of dry ingredients and I have less fruit or something I will add another tablespoon but usually I like to keep it light. I like to combine all of my ingredients in a bowl and mix it, then place a plate on top and flip the two over together so everything gets evenly mixed.

Voila enjoy! This is large enough to eat if you were like me yesterday and missed breakfast so were starving but still needed to fit in the gym before work, it will fill you up and get you through your workout without feeling like you are going to vomit. Or it can even be shared if you just want it as a side to something else.


Thursday, August 29, 2013

MOM IS COMING TO DINNER!


So mom is coming to dinner! She misses me and wants to hang out, cue the awwws. What can I say I was a pretty great kid. :-P Anyways what to make the woman who brought you into this world, who suffered through your rebellious teenage years of being a complete brat without killing you, and has simply been there to talk you through your most stressful times when she herself had dealt with so much worse but never letting onto the fact that your problems were any less devastating??

A fantastic meal made with love and kindness that is. This had me thinking comfort food, I couldn't get creamy whipped potatoes out of my head. Sometimes for me when I fixate on a certain item I simply have to make it. Or it won't go away. So we knew this meal would be mashed potatoes. Then what? Well what goes better with mashed potatoes than steak? Nothing I could think of at the time. Also we are transitioning into my FAVORITE season of the year. Fall. Nothing is better than Fall. That being said I thought of roasted squash and then the mashed potatoes turned into mashed SWEET potatoes a concoction that would surely have my roommate drooling at just the thought and wham bam we had a meal on our hands.

(Disclaimer Here: I just moved and am getting used to the grocery stores in the area, the selection of steaks at the local store was not up to par and I will be searching around more next time, but time being a factor I went with what was available.)

Anyways on to how I did it.


The first thing I wanted to do was get the steaks in a marinade, the longer they sit the better the flavor, but a good fifteen to twenty minutes will do ya just fine!

Steaks:
2 steaks of your choosing ( I used the NY Strip steaks here)
3 cloves of garlic minced
1/4 c. worcestershire sauce
1/4 c. canola and olive oil blend ( you can simply use olive oil or canola oil, whatever you have on hand)
salt and pepper to season

First I seasoned the steaks with salt and pepper on each side. Then in a gallon sized bag I added the rest of the ingredients and threw the steaks in with it. Mixing it all together by giving the bag a good shake. Then I put it in a bowl and in the fridge to break down the flavors.

After they have marinated and your grill is nice and hot pull them out of the fridge and cook to your desired doneness. If you are making this meal like me in your kitchen, because after many years of dorm life and now apartment living you don't actually own an outside grill/ are kind of scared to use one by yourself but you are craving a steak or grilled item, don't you worry let me introduce you to my friend George.

George Foreman that is. This little counter friendly device is probably my second highest used piece of equipment. I use it for everything. It even comes with a little booklet on cooking temps that I visit often. It is fast to heat up and easy to clean. The teflon coating doesn't require you to use any extra oils or fats to keep from sticking and all the excess fats drain off into the drip pan at the bottom! Okay enough with the advertising. Simply put if you don't have one of these it is the best 50 or so bucks you will spend!

Mashed Sweet Potatoes (I.E. Heaven):
3 raw sweet potatoes
1/2 stick of butter ( I used unsalted but salted will work as well)
2 T. of honey
1/2 T. pumpkin pie spice ( or 1/2 tsp. each of cinnamon and nutmeg)
1/2 c. heavy whipping cream ( I just happened to have this in my fridge but I usually use whatever kind of milk I have on hand, you can substitute for convenience or even for nutrition purposes)

First you want to wash the potatoes thoroughly. I like to leave the skin on for the nutrients and also because I like my mashed potatoes to have a little chunk in them. (Also secretly I LOATHE peeling potatoes.) Next you want to chop them into bite sized chunks like so: 
If you have never dealt with sweet potatoes in their raw form note that they are much denser and harder to cut than regular potatoes. Just use a sharp heavy knife and caution when working with them. Remember slow and steady wins the race. 
After you have them chopped up transfer them into a pot big enough so that you can cover them with water leaving a good third or fourth of the pot unfilled. If you don't have a pot big enough that is fine you will just have to stay close during the cooking process so that they don't boil over and when they get close simple stir them to calm them down or reduce the temperature.
I covered the potatoes and had them at a medium high heat until they boiled. Then I removed the lid and let them cook for about 15 minutes until they were fork tender. (Total cooking process 25 minutes) Depending on how many you use this could take longer. Just remember fork tender and you are golden.
Next I strained them in the sink like so:
(If you aren't familiar with what I mean by fork tender, I mean that you can easily poke your fork into any potato and it would be soft enough to eat. I usually check a couple just to make sure)
Next I transfer them into my kitchen aid ( probably the best kitchen gift I have ever received (THANKS MOM)) and I add in the rest of the ingredients. The butter first I usually forget to pull it out and it is cold and solid so I let it melt a little over the hot potatoes before I begin mixing. Then I add in the honey and the spices and start the mixer at a low speed as I pour in the cream slowly as it is blending. Whip to your desired chunkiness or smoothness consistency and dip a spoon in to taste test! 
(That last step is the most crucial to me!)
YUM!

Roasted Squash:
2 yellow squash washed
1/4 tsp. salt
1/4 tsp. pepper
1/8 c. italian style breadcrumbs
1 1/2 T.- 2 T. oil

Okay this part couldn't be easier. You wash the squash (because again you are leaving on the skin.) Cut into bite sized chunks. Put into a baking dish season with salt and pepper. Drizzle the oil evenly on top. (You can use your desired oil amount here, you could even roast them without if you are using a nicely teflon coated pan, to make them healthier, but to avoid sticking I add a little oil.) Top with the breadcrumbs. Progresso makes a good italian blend. 
Bake at 450 degrees for about 15-20 minutes. Again fork tender but with a little crunch left in them.

Now all you have to do is sit back and ENJOY your meal with your mom, dad, friend, sibling, whoever!