But anyways I mostly can't wait for the weather changes. This is the first Fall in my life that I haven't gone back to school. So while yes it is fantastic to be done and graduated and all educated and what not, I miss those traditions so now all I have to look forward to are the fun Fall foods, activities, and weather changes and darn it I need it now! I just want to start making pumpkin flavored everything and that to be acceptable again. Is that too much to ask?
Anyways enough of that tangent here is how I tried to delve into the season.
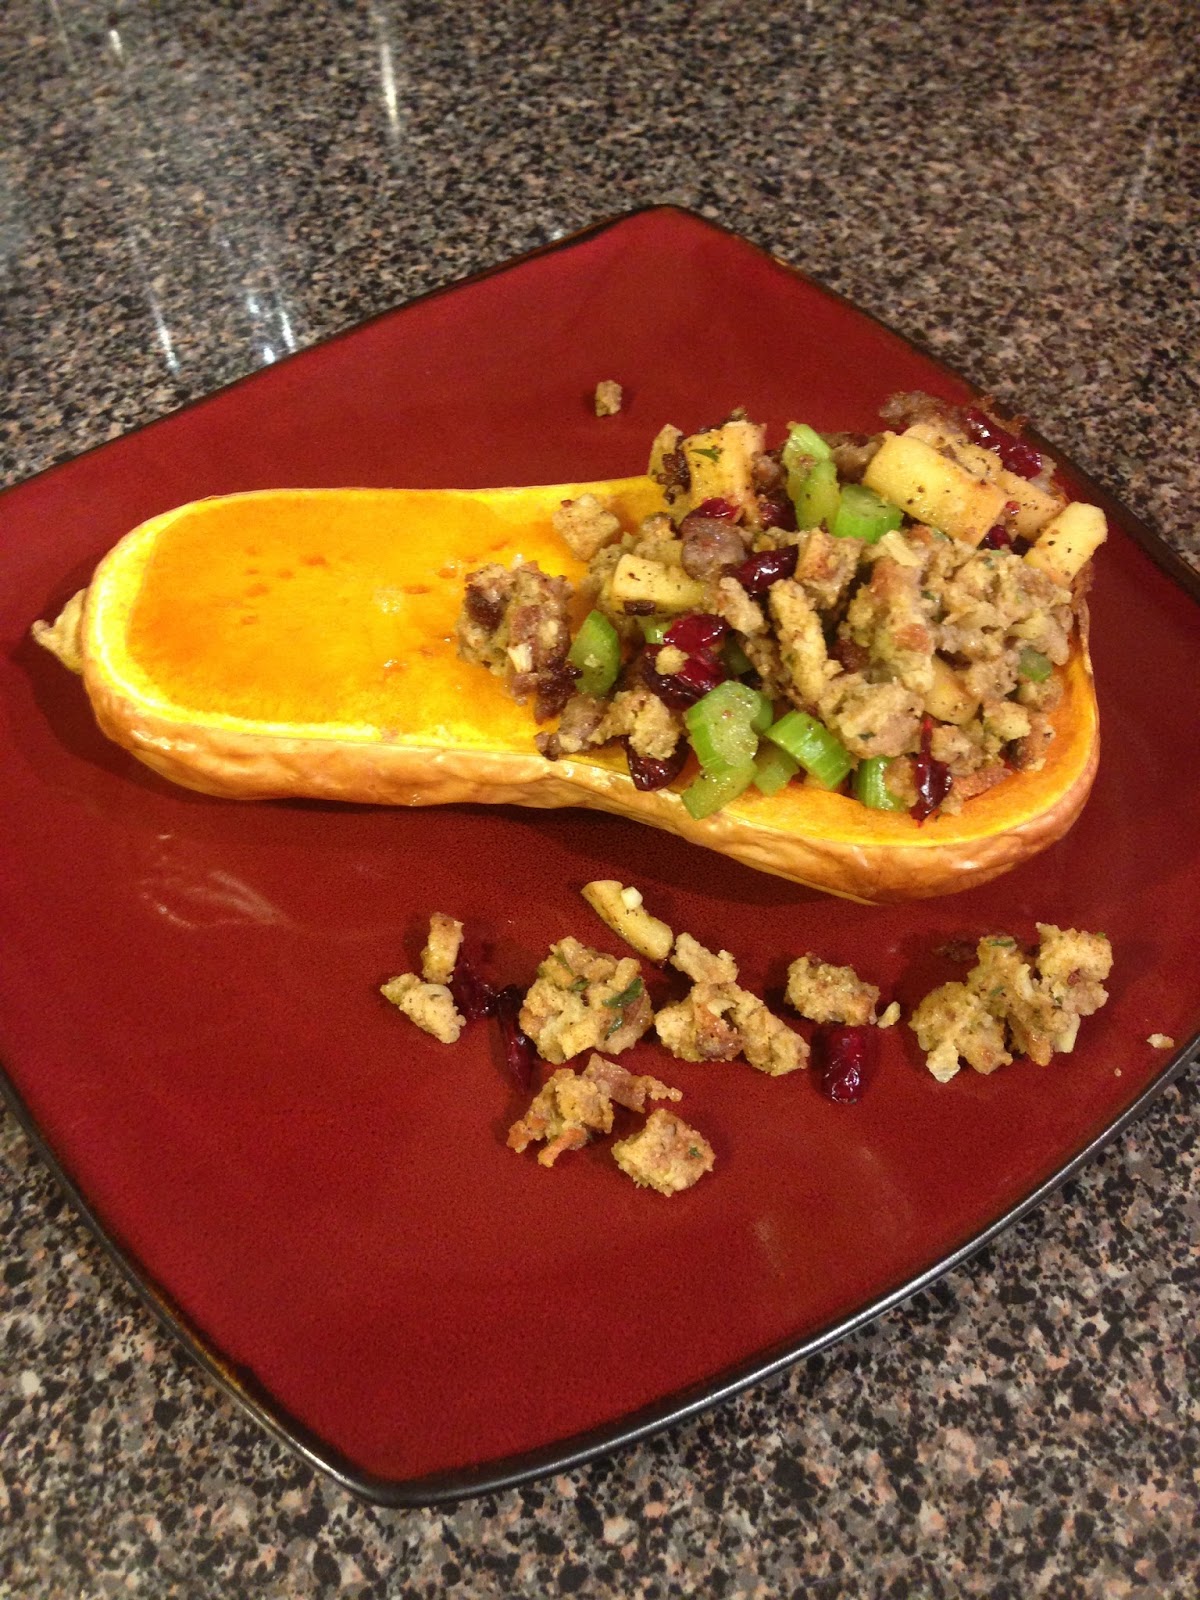
Stuffed Squash
Serves: 2
Cook Time: 1 hour
1 butternut squash ( or you can even use acorn squash if you prefer it)
1/2 stalk celery
1/2 apple
1/3 chub of sausage (about 5 oz) I used maple flavored Jimmy Dean
1 c. whole wheat chicken flavored stovetop stuffing
1/4 c. dried cranberries (reduced sugar or unsweetened)
1 T. per half of squash of brown sugar (optional)
drizzle of honey (optional)

Set your oven to 450 degrees. Cut your squash in half and remove the guts and the seeds. Place in a pan and bake for 45 minutes. Then add in brown sugar to the bowls of the squash and drizzle with honey (if desired) and bake for an additional 15 minutes. If not just roast for an hour. (This worked for the size squash I had but you want to be able to stab your fork in and the squash to be fork tender, adjust cooking time for your size squash. Roughly an hour should do ya though.


I added brown sugar and honey to the bowl and the top of the squash but it just sort of pooled around and wasn't really needed on top. Butternut squash already has such good flavor you can save the calories and skip the brown sugar and honey all together and be fine, heck you might not even notice. I was just going for a little extra comfort with this dish.
While the squash is roasting cook your sausage in a small pan. Oh and if you don't know what a chub is I took a picture. (But of course not until after I used it so its not as pretty but you get the idea.)

I like my sausage a little crispier to add texture to the dish.


Next you want to cook your stove top according to the package directions. This is the flavor I like and used but feel free to substitute your own preference or even a different type of stuffing.
After you have done that then cut up your apple and celery. I then sautéed them in the pan I just cooked the sausage in with a little salt and pepper for about 2-3 minutes to cook them down a little but also keep most of their crunch.
Then you want to mix together the sausage, stuffing, apples, celery and dried cranberries.

Then just add your mixture to the roasted squash and eat! As you can probably tell this dish is super filling. So if you are a very light eater make sure that you keep that in mind when picking the size of squash you are going to stuff. Half a squash stuffed me to the brim but if you have a heavy eater on your hands make extra stuffing mixture and serve it stuffed and along the side or even have a side salad with your meal.
Now that I think about it though I could have been stuffed because of this little appetizer I set up while my roommate, her boyfriend and I were cooking!
 I found plumcots and these little cactus pears in the produce section of the store that I was more than curious about trying. So when I brought them home I decided to set them up with some cheese and almonds so we could all sample them. My roommate and I were huge fans of the plumcots ( a plum apricot hybrid.) That is what is pictured in the center. On top are the cactus pears, they sort of tasted like a mix between a watermelon and pomegranate. Not my favorite but her boyfriend enjoyed them and they were pretty!

Okay now onto some real fun cooking and by fun I mean partly pain in the butt because I skipped certain crucial steps that I will make sure to include in the directions here so you don't do the same. But let me tell you my little spiel about baking first. I love the end result and I am actually pretty good at it. I have a feel go to recipes in my arsenal that never fail me and even sometimes I will get the I have to bake everything in the house bug. But by no means would I consider baking to be my forte. I am all about easy and convenient when it comes to baking. Plus I really hate the aspect of how with baking you spend a lot of tedious time making things look perfect. Sometimes I can do this, but I really have to be in the mood, or it has to be a special occasion, and likely I can't have focused my attention on anything else. That is why this simple 4 ingredient recipe is near and dear to my heart. It is easy, it is quick and perfection is not a requirement.
Sparkly Oreo Balls
1 row of Oreo double stuffed cookies
1/2 a block of cream cheese (room temp.)
1 c. of chocolate chips of your choice ( white chocolate tastes best in my opinion)
sprinkles

This photo is actually from a batch I made last Valentines day. I hit a couple of snags when making the recipe this time, they still turned out delicious but for the sake of what I like them to look like this is the model. (See baking = a pain in the rear!)
Okay first you are going to want to crush your Oreos, the finer the better. I am blessed enough to have a food processor that does this little task in about oh I don't know a minute. A blender will work just as well but if you don't have either of those items, no worries, simply put them in a ziploc bag ( I recommend using two just in case it pops open) and crushing them either with a rolling pin or a heavy pan.

Next you will want to mix the cream cheese and your Oreos together until they are combined, like so.

Okay so that is not the best picture ever taken, but again you get the point. You want the two to be combined with no loose crumbs. I did this with a rubber spatula and took my time with it but you can get your hands in there and probably do it a lot faster.
Then you want to form them into balls. Now we had a little debate at my house, when I made the pink ones pictured above they were huge like ice cream scoop big. You can only just eat one of those. Or even half of one. This time I opted to make them smaller just little bite size niblets. We never really reached a conclusion as to what was better. Having them big like that where you will for sure only eat one but know that eating one is awful for you or the cute little baby ones I made last night where self control might not actually be on your side. So I will let that decision be left up to you.
After you have formed them into whatever size ball your heart desires and I must stress how crucial this step is because I forgot it last night and it was a mess! But place them on a lined cookie sheet or whatever is available to you and freeze them until firm! About 10 minutes. If you skip this step then when you dip them in chocolate the chocolate will be too heavy and tear your soft little Oreo babies apart. Trust me, not fun.

After they are firm melt your chocolate chips. Save yourself the trouble and do this in the microwave. I first attempted to do it stovetop and without a double boiler, it is hard to not burn your chocolate on the stove. Which resulted in snag number two I burnt all the white chocolate in the house, and had to use dark and while I much prefer dark over white, this recipe is an exception. White just balances the flavors better. So take your cup of chocolate chips and melt them for about 45 seconds in the microwave. They will not be completely melted and you will have to stir them down so they are creamy enough to coat your Oreo balls with but too much time will burn the chocolate. So just mix. If they are being stubborn you can pop them back in the microwave for about 10 more seconds tops.
Next just coat the Oreo balls in chocolate and sprinkles of your choosing and place them back on the cookie sheet and in the fridge to harden. Another 10-15 minutes or however long you would like until you serve them. I usually do this and leave them overnight.
The sprinkles are optional but they make them pretty and add a nice little crunch, and not even being a huge fan of sprinkles myself that is saying something for their existence in this recipe. But you are more than welcome to skip that part if you so desire.


This is what they looked like last night with the dark chocolate and how they looked in the center after you bit into them. YUMMMM!
No comments:
Post a Comment